
------ body content display, start to learn new knowledge ------
The functions are as follows:
Support one-click start Spring boot project. tomcat built-in project tomcat standalone project
I. Introduction
The Spring boot project only needs a JDK environment to deploy successfully.
Tomcat built-in projects require Tomcat to be installed in order to deploy successfully.
Tomcat standalone projects require Tomcat to be installed in order to deploy successfully. One project with one Tomcat running independently of each other will not affect other tomcat projects.
Deploying the Springboot projectThe JDK needs to be present on the system.]
The test here is to use jenkins from the jenkins official website to download the 2.344 version of the war package
https://ftp.belnet.be/mirror/jenkins/war/2.344/jenkins.war
The file is placed under /www/jar.
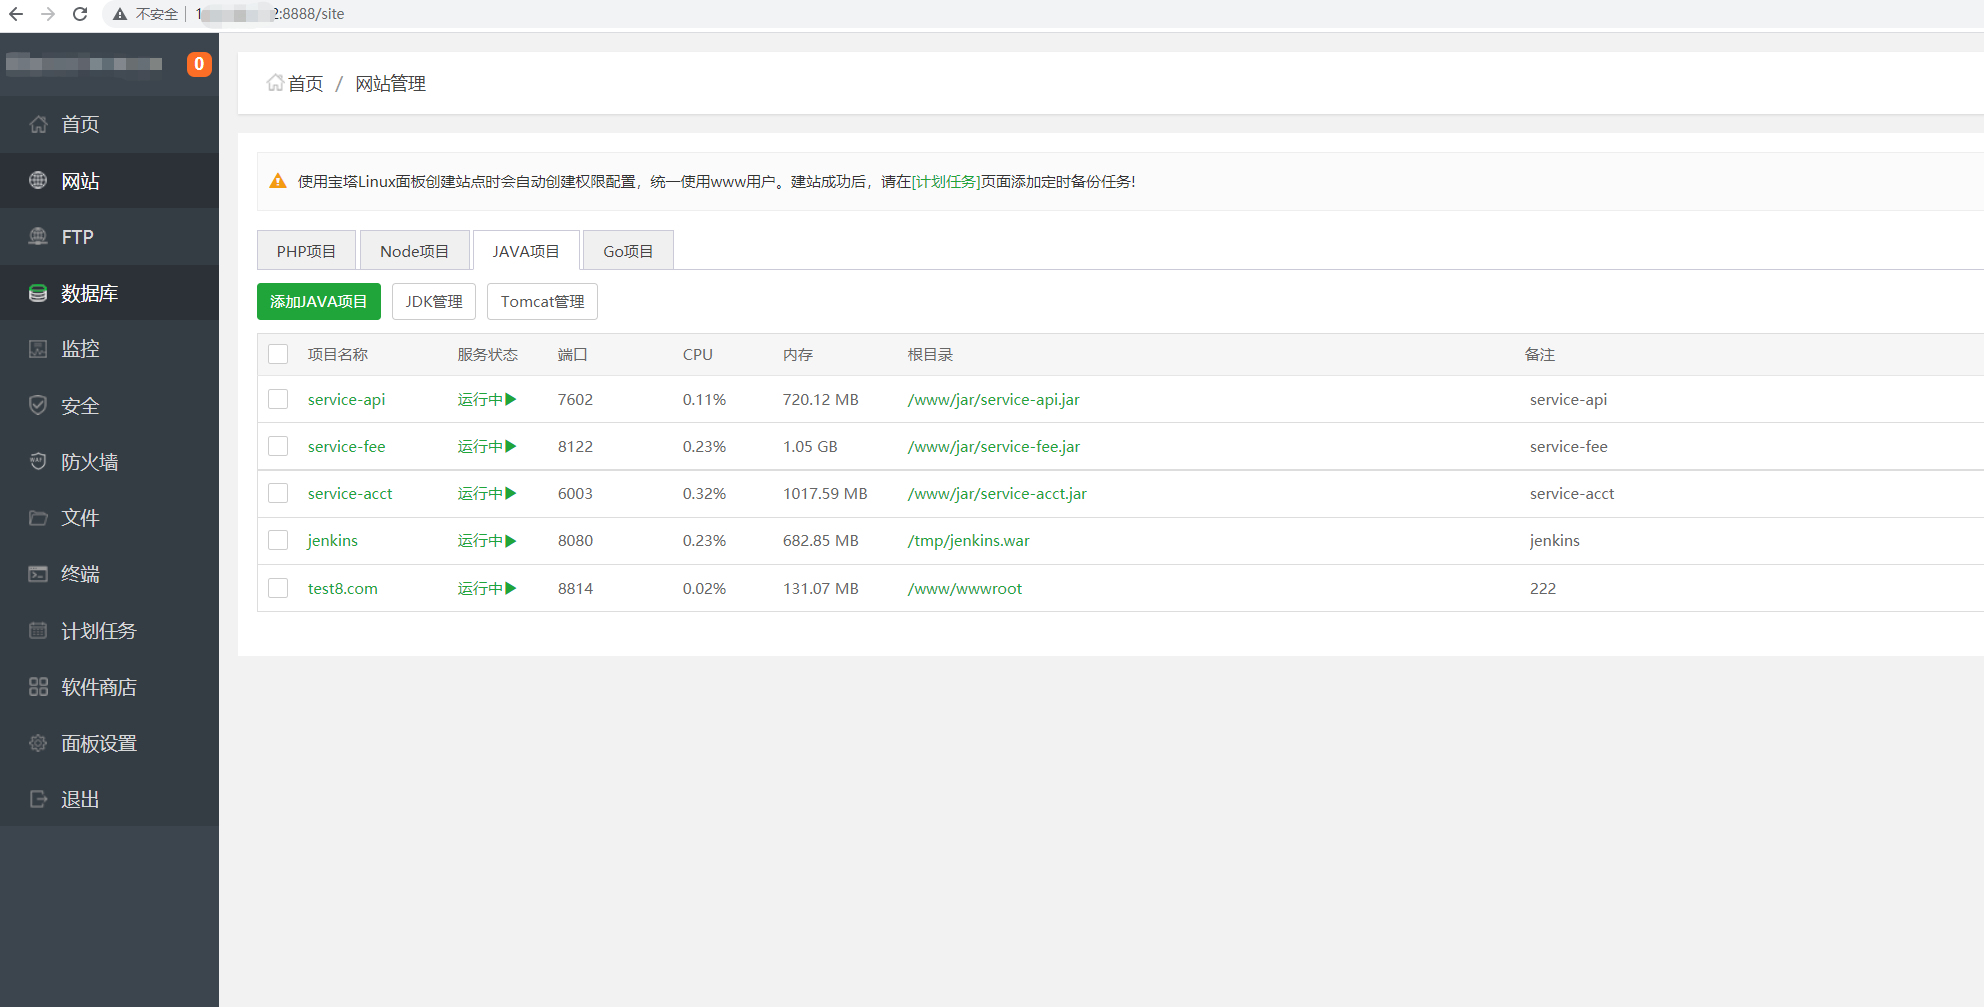
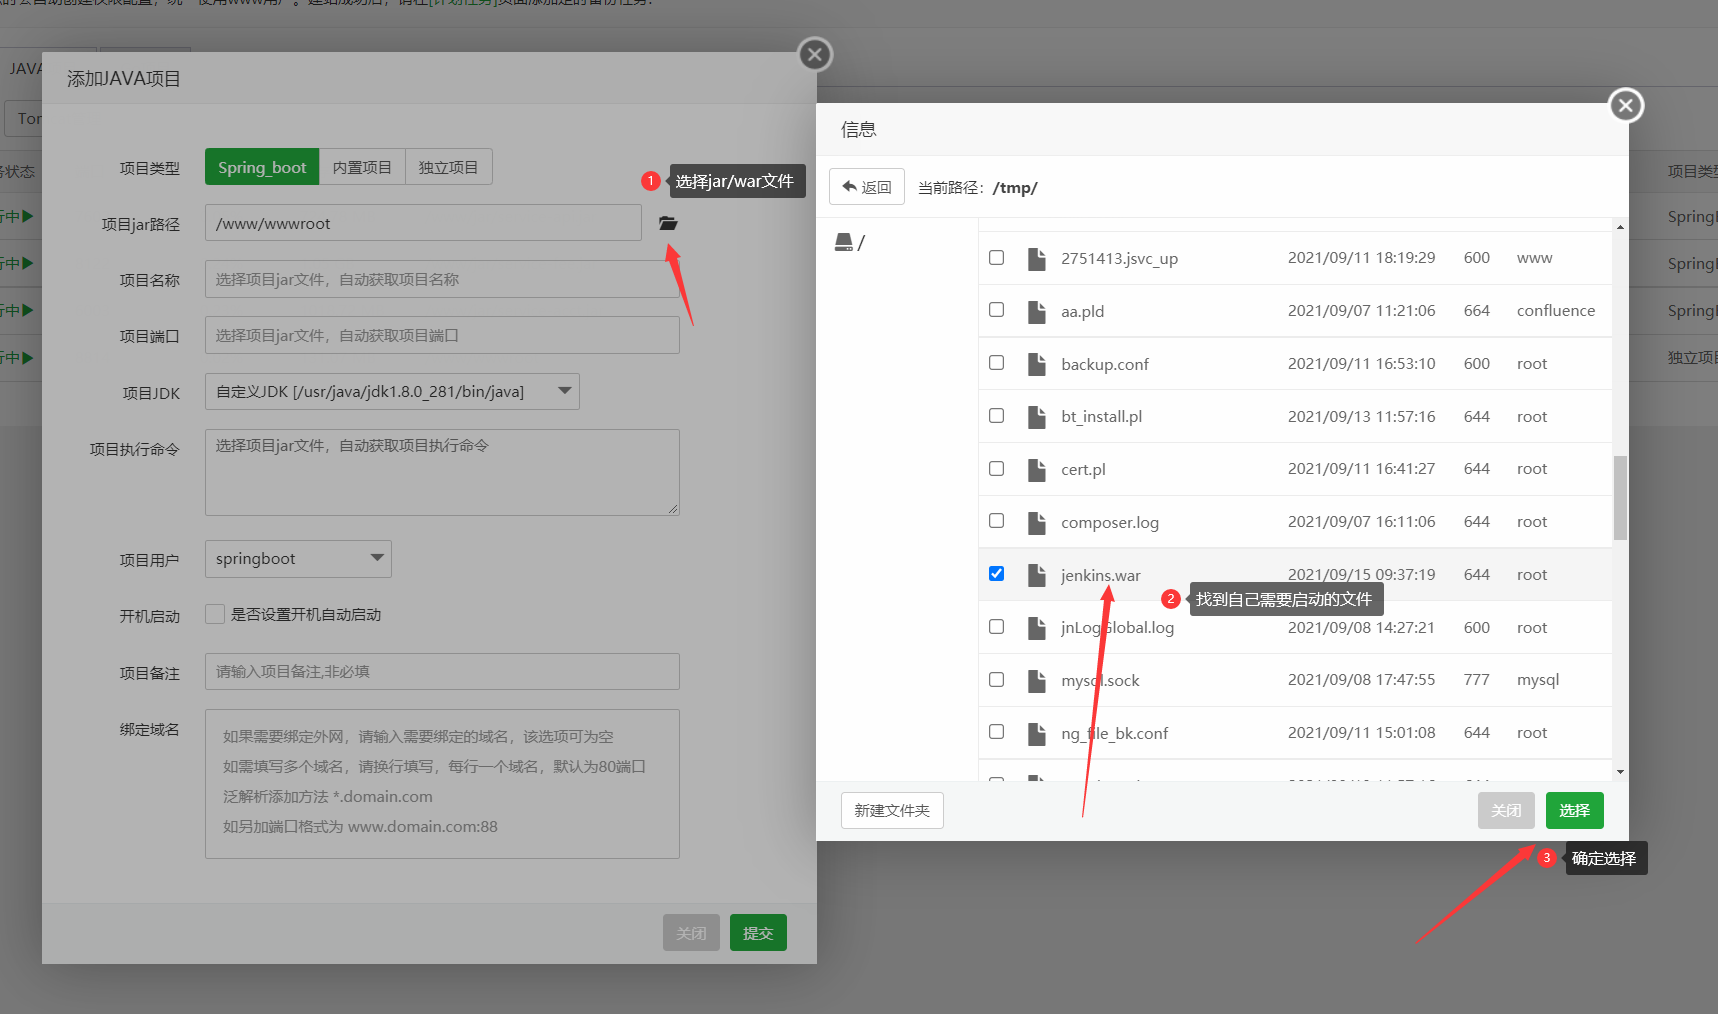
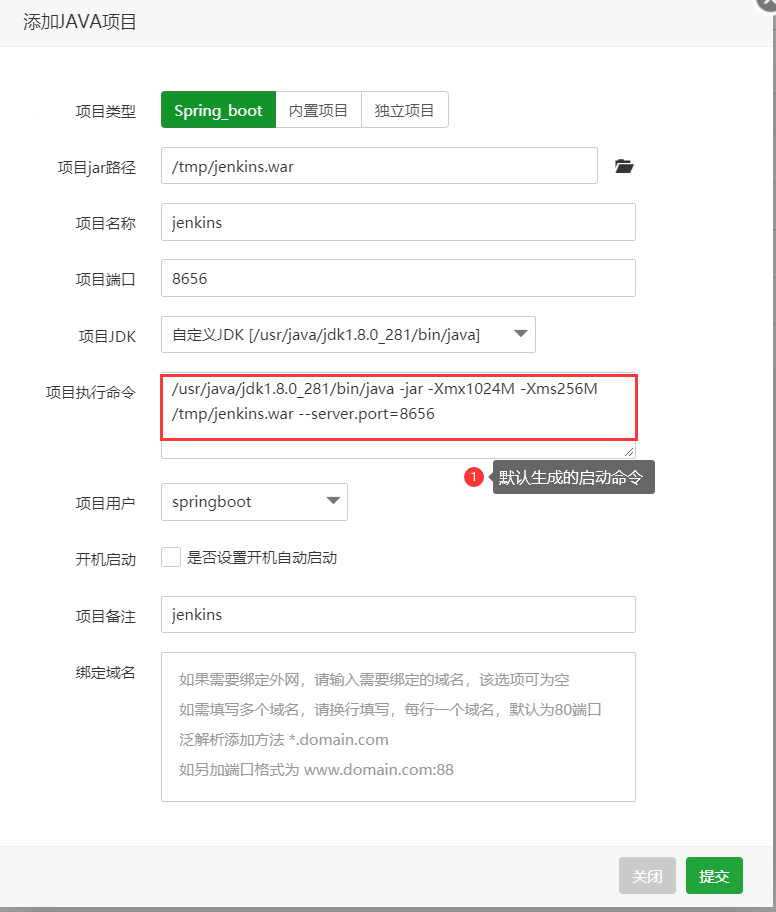
![Image [1] - Pagoda New version of Java Project Deployment Tutorial - HootSuite Source Code - Software customization and development](https://www.bt.cn/bbs/data/attachment/forum/202303/28/110810emtwc9zvcabel419.png) After the selection is complete. It will automatically populate the startup command for you. If you need to change the startup commands you can do so at will ![Image [2] - Pagoda New version of Java Project Deployment Tutorial - HootSuite Source Code - Software customization and development](https://www.bt.cn/bbs/data/attachment/forum/202303/28/110905g0pfyhevzpmpy0wy.png) The default startup command is as follows: [Note that jenkins does not support server.port listening on ports]. /usr/local/btjdk/jdk8/bin/java -jar -Xmx1024M -Xms256M /www/jar/jenkins.war -server.port=6192Copy CodeStartup Commands Explained Path to /usr/java/jdk1.8.0_281/bin/java JDK -Xmx1024M -Xms256M Limit maximum memory to 1024M Minimum memory 256M -server.port=6192 Started port You can change the startup commands and parameters as you like. For example, I changed it to start as follows /usr/local/btjdk/jdk8/bin/java -jar -Xmx1024M -Xms256M /www/jar/jenkins.war -httpPort=6312Copy Code After the submission is complete, you will see a page to see if the project was launched successfully. ![Image [3] - Pagoda New version of Java Project Deployment Tutorial - HootSuite Source Code - Software customization and development](https://www.bt.cn/bbs/data/attachment/forum/202109/15/113552zp2ucnosop9ibkuu.png) Ports will not be displayed when they are first started. You need to wait for the project to start up completely before you can display the started ports. ![Image [4] - Pagoda New version of Java Project Deployment Tutorial - HootSuite Source Code - Software customization and development](https://www.bt.cn/bbs/data/attachment/forum/202109/15/113720enn1b4qg9ldw2xnw.png) Access items ip:port ![Image [5] - Pagoda New version of Java Project Deployment Tutorial - HootSuite Source Code - Software customization and development](https://www.bt.cn/bbs/data/attachment/forum/202109/15/113819x5ygxh2nbxrngb5z.png) If you need 80 access. You need to add a domain name and enable external mapping as follows: ![Image [6] - Pagoda New version of Java Project Deployment Tutorial - HootSuite Source Code - Software customization and development](https://www.bt.cn/bbs/data/attachment/forum/202109/15/114650z16wayk9iujk63j4.png) ![Image [7] - Pagoda New version of Java Project Deployment Tutorial - HootSuite Source Code - Software customization and development](https://www.bt.cn/bbs/data/attachment/forum/202109/15/114338xoe0qcmnqzwyeaoe.png) When it's turned on successfully, visit and test it. ![Image [8] - Pagoda New version of Java Project Deployment Tutorial - HootSuite Source Code - Software customization and development](https://www.bt.cn/bbs/data/attachment/forum/202109/15/114425zyvve1agvvidqvnv.png) Deploying Tomcat built-in projects 2.1 Built-in Project Introduction The built-in project allows you to set up multiple projects. The disadvantage is that multiple projects may cause conflicts between them. Support for Tomcat7 tomcat8 tomcat9 Ubuntu and Debian do not support Tomcat7 only Tomcat8 Tomcat9 Centos7 Centos8 support tomcat7 tomcat8 tomcat9 Install Tomcat as follows: ![Image [9] - Pagoda New version of Java Project Deployment Tutorial - HootSuite Source Code - Software customization and development](https://www.bt.cn/bbs/data/attachment/forum/202109/16/144443ck2gka2fn2kan1ok.png) Just click to install ![Image [10] - Pagoda New version of Java Project Deployment Tutorial - HootSuite Source Code - Software customization and development](https://www.bt.cn/bbs/data/attachment/forum/202109/16/144905ne1e15l9m4hwf755.png) After the installation is complete, you can see the startup status and port information of Tomcat. ![Image [11] - Pagoda New version of Java Project Deployment Tutorial - Hueiyue Technology Source Code - Software customization and development](https://www.bt.cn/bbs/data/attachment/forum/202109/16/144956qfavlkhqvl5wofv5.png) 2.2 New built-in project ![Image [12] - Pagoda New Java Project Deployment Tutorial - HootSuite Source Code - Custom Software Development](https://www.bt.cn/bbs/data/attachment/forum/202109/16/145440jf43y9q0rf0om3iq.png) Submit to start the project After the startup is complete, you can see the specific occupancy information of the project ![Image [13] - Pagoda New Java Project Deployment Tutorial - HootSuite Source Code - Custom Software Development](https://www.bt.cn/bbs/data/attachment/forum/202109/16/145542do9yxhloxiha1ei9.png) 2.3 Uploading a war or uploading a web archive Here's a test with two cases. 2.3.1 Testing index.jsp ![Image [14] - Pagoda New Java Project Deployment Tutorial - Hueiyue Technology Source Code - Software customization and development](https://www.bt.cn/bbs/data/attachment/forum/202109/16/150017topxvwhh5zvv83n9.png) Test access to test.com ![Image [15] - Pagoda New Java Project Deployment Tutorial - Hueiyue Technology Source Code - Software customization and development](https://www.bt.cn/bbs/data/attachment/forum/202109/16/150220w93q56n5mvkqnzo3.png) Test jenkins.war on tomcat. https://ftp.belnet.be/mirror/jenkins/war/2.312/jenkins.war After downloading. Put it in the root directory of my website. Then unzip it. ![Image [16] - Pagoda New Java Project Deployment Tutorial - HootSuite Source Code - Custom Software Development](https://www.bt.cn/bbs/data/attachment/forum/202109/16/150853gmml91zxmi9rkmlk.png) ![Image [17] - Pagoda New Java Project Deployment Tutorial - HootSuite Source Code - Custom Software Development](https://www.bt.cn/bbs/data/attachment/forum/202109/16/150910amifdr5qsihoq9je.png) After decompression is complete. Delete the current war package. Or move it to another directory. You need to restart Tomcat before you can access the project. ![Image [18] - Pagoda New Java Project Deployment Tutorial - Hueiyue Technology Source Code - Software customization and development](https://www.bt.cn/bbs/data/attachment/forum/202109/16/151149qesesxxe3scqsesw.png) Visit the website afterward. ![Image [19] - Pagoda New version of Java Project Deployment Tutorial - HootSuite Source Code - Software customization and development](https://www.bt.cn/bbs/data/attachment/forum/202109/16/151331yp5npjlqxqwrqwqw.png) Deploying Tomcat standalone project 3.1 Introduction Standalone project You can start a Tomcat in a separate project. Pros: Separate resource. Does not affect other projects Cons: Takes up more resources than the built-in program Ubuntu and Debian do not support Tomcat7 only Tomcat8 Tomcat9 Centos7 Centos8 support tomcat7 tomcat8 tomcat9 Install Tomcat as follows: Just click to install After the installation is complete, you can see the startup status and port information of Tomcat. 3.2 Creating stand-alone projects ![Picture [20]-Pagoda New Java Project Deployment Tutorial - HootSuite Source Code - Software customization and development](https://www.bt.cn/bbs/data/attachment/forum/202109/16/151818m77d6y70ed5r1enx.png) After creation, you can see the CPU and memory information of the current project. ![Picture [21] - Pagoda New version of Java Project Deployment Tutorial - HootSuite Source Code - Software customization and development](https://www.bt.cn/bbs/data/attachment/forum/202109/16/151940ps1gbdd6aqdcdc1w.png) 2.3 Uploading a war or uploading a web archive Here's a test with two cases. 2.3.1 Testing index.jsp ![Image [22] - Pagoda New version of Java Project Deployment Tutorial - HootSuite Source Code - Software customization and development](https://www.bt.cn/bbs/data/attachment/forum/202109/16/152211cmf8le14v6mva94e.png) A single index.jsp project does not require a project restart. Direct access is available The access was successful as follows: ![Image [23] - Pagoda New Java Project Deployment Tutorial - HootSuite Source Code - Custom Software Development](https://www.bt.cn/bbs/data/attachment/forum/202109/16/152259l1bckkqdic81kzc9.png) 2.3.2 Testing jenkins.war First you need to upload the WAR package to the website with the directory. Then unzip it ![Image [24]-Pagoda New Java Project Deployment Tutorial - Hueiyue Technology Source Code - Software customization and development](https://www.bt.cn/bbs/data/attachment/forum/202109/16/152616tppj4aqjy4n4ny5r.png) ![Picture [25] - Pagoda New version of Java Project Deployment Tutorial - HootSuite Source Code - Software customization and development](https://www.bt.cn/bbs/data/attachment/forum/202109/16/152651ubqphqbbfbq6pvbf.png) Remember to restart the current project after the decompression is complete as follows: ![Image [26] - Pagoda New Java Project Deployment Tutorial - HootSuite Source Code - Custom Software Development](https://www.bt.cn/bbs/data/attachment/forum/202109/16/153024t6cmc8i8z832c182.png) Visit the site after the reboot is complete ![Image [27] - Pagoda New Java Project Deployment Tutorial - Hueiyue Technology Source Code - Software customization and development](https://www.bt.cn/bbs/data/attachment/forum/202109/16/153104n3vgmh969e6v6o84.png) IV. Summary of issues 4.1 Issue 1: If you don't have a domain name and only want to use IP+Port for project deployment You can decompress the war package by placing it in the tomcat webaps directory. The following is an example of how to do this: The tomcat installation directory and port are as follows: tomcat7 installation directory in /usr/local/bttomcat/tomcat7 port number 8231 tomcat8 installation directory /usr/local/bttomcat/tomcat8 port number 8232 tomcat9 installation directory /usr/local/bttomcat/tomcat9 port number 8233 4.1.1 Deploying jenkins without a domain name on Tomcat8 [I First you need to go to /usr/local/bttomcat/tomcat8/webapps Then create a new directory. Then upload your war package. ![Picture [28] - Pagoda New version of Java Project Deployment Tutorial - HootSuite Source Code - Software customization and development](https://www.bt.cn/bbs/data/attachment/forum/202109/16/154441mlwbbbqnwaoh9n5l.png) Remember to delete that WAR package after unzipping. After decompression, restart tomcat to access the project. ![Image [29] - Pagoda New Java Project Deployment Tutorial - Hueiyue Technology Source Code - Software customization and development](https://www.bt.cn/bbs/data/attachment/forum/202109/16/154618c09bhj5d0ijh9503.png) Then access Ip:8232/the directory you created Example. My IP is 192.168.1.72 My new directory is test Then the URL is as follows: http://192.168.1.72:8232/test ![Picture [30]-Pagoda New Java Project Deployment Tutorial - HootSuite Source Code - Software customization and development](https://www.bt.cn/bbs/data/attachment/forum/202109/16/154750eh01eepac9hpe90i.png) 4.1.2 Deploying jenkins without a domain name on Tomcat8 [II Deploying a project using Tomcat manager Tomcat has a built-in manager for project management. Here's how it works ![Image [31] - Pagoda New Java Project Deployment Tutorial - HootSuite Source Code - Custom Software Development](https://www.bt.cn/bbs/data/attachment/forum/202109/16/154945ju0op0vd6mhdmadi.png) Opened DetailstutorialsBelow: https://blog.csdn.net/feinifi/article/details/80704564 4.1 Issue 2: Why did the project start-up fail? Please read more about the error message ![Image [32] - Pagoda New version of Java Project Deployment Tutorial - Hueiyue Technology Source Code - Software customization and development](https://www.bt.cn/bbs/data/attachment/forum/202109/16/155748kkah9b9nmohko9ra.png) 4.3 Question 3: How is SSL supported? The new version of the Java project supports one-click SSL certificate application. ![Image [33] - Pagoda New version of Java Project Deployment Tutorial - HootSuite Source Code - Software customization and development](https://www.bt.cn/bbs/data/attachment/forum/202109/16/155901h3hnz2a2ndwe26mw.png) 4.3 Question 4: Why is it suddenly 502? There are a variety of problems with the 502. Most of them are back-end issues. It could be that the port of your project is incorrectly filled in. It is also possible that the Java back-end service hangs. There are many aspects of the problem. |
Warm Tip:
This article was last updated on
2024-07-13 11:08:30Please note that some articles are time-sensitive, so if there are any errors or if they are no longer valid, please check below.leave a messageor contactHootSuite OfficialThe
本站所有系统源码请合法合规使用,严禁从事违法犯罪,侵权等任何非法活动,违法犯罪毁三代,且行且珍惜!
© copyright statement
THE END










No comments